A Trip Back to '81...

...no, not 1781 - 1981!
Stumbled across a top ten list of Age of Sail board games at Board Game Geek [CLICK], and couldn't resist checking them all out while on a dull bus ride. One immediately stood out despite the simple title that requires a lengthy sub-title to differentiated it from several other rule sets - "Fighting Sail: Sea Combat in the Era of Canvas and Shot, 1775-1815". This is designed by the distinguished author, historian and wargame designer Joseph M. Balkoski [CLICK] who authored many other titles of note [CLICK], any of which I'd consider based upon this design!
This caught my attention because it uses a grid with 8 directions / facings, which I have thought for a while was better than the 6 available thru a hex game board, and a bit faster than measuring with a protractor all the time on an open table. Also, the commentary sold it pretty hard:
"Fighting Sail is a brilliant little gem. It's innovative, easy to learn, easy to play, and has excellent historical flavor without bogging down in mundane detail. This is probably the best balance between playability and authenticity I've ever seen."
REVIEWS, AARs, etc. Best summaries are at Board Game Geek, unsurprisingly [CLICK]. There are also a couple of interesting ship v. ship AARs on the famous HMS Shannon v. USS Chesapeake [CLICK] and [CLICK] unfortunately without pics.
GAME AVAILABILITY. There were three good copies for $16 or so at BGG so I was literally "sold" acquiring a mint copy very easily. There is also a rules summary pDF provided by a gamer here [CLICK] at the bottom under "files". So if you are not interested in the physical components of the game, you can still check out the rules.
When the game arrived, I cracked it open and checked it out.
THE COUNTER SHEET is quite limited since this is a magazine game. The markers are order chits that show a ships Sailing Value, A - C [A is best], on one side and the other shows an order and the number of Movement Points the ship has. The ships are British, French [one Portugese] and American with the usual top-down silhouette that works so nicely in many other games. Overall, they are quite functional if not eye-catching, but I like them better than Wooden Ships and Iron Men, anyway. Typical of S&T back in the day.

Back side shows the order selections and the numbers are rotated to show the ship's available movement points. Once a ship has fired, it is flipped onto its white side which has a Fire Value of "0" to show it has Fired. Obviously, more important in fleet actions. But a handy way to keep track with the color change to white.


THE RULES cover all the essential aspects of naval warfare in the age of sail, including: ocean swell, Studding Sails, Boarding Actions, Fouling and Unfouling, and gun Fire. Fire has modifiers for the Rate [size] of ship, Range, Damage, Firing at Rigging v. Hull, Critical Hits [masts, wheel, and fire], Rakes and Initial Broadsides.
THE SCALE is given at 7.5 minutes a turn, which makes for 8 turns an hour. This is reflected in the Strategic Cycle of the Turn Sequence where ocean swell, ship fires and studding sails are handled. There is no ground scale [ocean scale?] given, but some simple math with ship speeds under fighting sail settings [about 4-8 knots] comes up with about 480 yards per square. This could easily be enlarged to 240 or even 120 yards per square with proportionate multiplication of ship movement points and range points, but the map would start to get small. Altho it makes the fouling rules a bit unrealistic, the fact that ships fire effectively against a peer at only around 1-2 squares seems about right for this scale.
THE SQUARE GRID is handled brilliantly, providing 8 directions and turning points of 45 degrees at which the ships can sail, two more than a hex grid provides [6 of 60 degrees]. More importantly, the nautical compass had 32 points so eighths fits nicely into that convention. It is worth reflecting that most nautical / English measurements are in halves and quarters, not tens / decimals [which is a metric convention]. Why? My thought is that it is easy to halve a length and then halve it again, quartering it, then halving it again, making eighths, etc.
DIAGONAL v. ORTHAGONAL is also smartly handled. Ships spend 3 MPs to move diagonally and 2 MPs to move orthaganally. This is 94% accurate which should be enough for even a picky gamer!
THE ABSTRACTION LEVEL is "just right" in that if you are playing the larger scenarios of 6-15 ships total, you can see what is happening with your squadron but don't get bogged down in useless details - the admiral doesn't care if the fire is in the galley or the sail storage locker. It is effects that are usually shown in the rules. While the ship v. ship actions could fit in some more details, they aren't necessary and only add color / flavor at the risk of bogging down the game. As it is, a ship v. ship action is a nice quick game of 30-45 minutes or so.
I selected 1-on-1 ship dual, the Shannon v. Chesapeake from the scenarios because the ships are very similar and I wanted to concentrate on the rules and tactics, not ship differences. Also, there are already two AARs posted about it at Boardgame Geek - may as well add to the list!
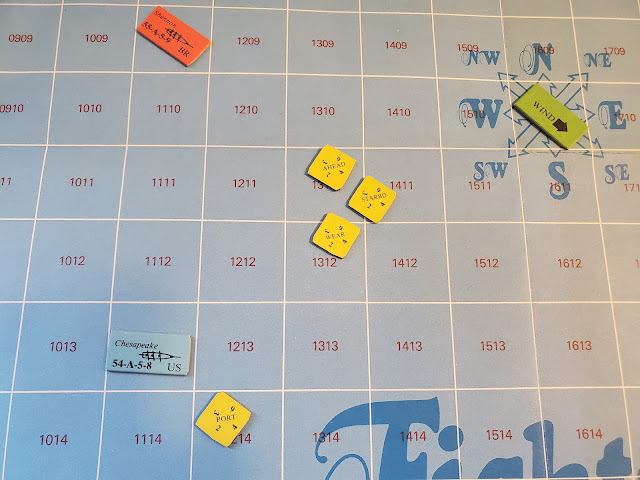
Altho the historical placement is different according to Mark Joseph's AAR [CLICK] and the wiki article [CLICK] I stuck with the Rules As Written [RAW] for now as this is a playtest and review. Only change is I moved them closer to the center of the board to show the wind and game title better.
 A closeup of the orders showing the options. Ahead is forward. Turns are Port / left and Starboard / right, requiring one but allowing up to two 45 degree turns to the side selected. Wear is to turn around with the wind behind you: Tack is the same but with the wind in front of you. When you reveal orders you also rotate them to show how many Movement Points [MP] a ship has - there are 5 total wind angles resulting in MP values from 3-6. Also, the side with the most ships with the highest MPs gets The Weather Gauge and can dictate the order in which ships move.
 ...so I flip them over and mix them up and select one randomly...
 ...resulting in Ahead for Shannon. I did this nearly all the time unless there was one order that was so obviously the right one there wasn't really a choice.

Shannon has an Ahead with 4 MP from her wind angle of Running. Chesapeake has a Port order with 6 MP from her wind angle of Broad Reach, the best wind angle for these ships to to sail. Chesapeake automatically has The Weather Gauge.
 Chesapeake forces Shannon to move first, resulting in her moving closer but still too far away to get a good shot - a perfect use of The Weather Gauge advantage!

Turn 1 ends with two hits for the Chesapeake and none for the Shannon - but Shannon still has both first broadsides while Chesapeake has used it's Port Side. It just took a few minutes to make the below ship logs - it took a lot longer to figure out what should be on it from reading the rules! There was no example.

Turn 1 ends with the ships positioned as below.

Turn 2 and both ships have MP 4 based upon their wind angle, and will have to dice off for who has The Weather Gauge. Chesapeake could select Ahead and attempt another bow rake, Starboard is a bit risky and a Wear would possibly position her to fire her other initial broadside - that would be ideal! Shannon will have to move into sq 1311 and may benefit from Port or Starboard turns or just select Ahead.
 Orders are selected then revealed: Chesapeake wins The Weather Gauge 5 - 1.
 If Chesapeake chose to move first, she'd end up farther away and decrease her Fire's effectiveness but fire first...
 So instead, she lets Shannon move [and fire] first. Shannon moves one sq Ahead and turns two points to Starboard [oops, should have been Starboard order]
 Shannon fires for a 41 which is under her Fire Value of 55 and inflicts a Hull Hit. She's then flipped to her fired [white] side.
 Chesapeake then Wears downwind and rolls low, but misses inflicting 2 Hull Hits by 1 pip - she needed a 14, not 15. This would have left Shannon crippled and almost ready to Strike! A close call...
 Turn 2 ends with both ships having fired. Damage is heavily in Chesapeak's favor at 3-1 Hull Hits. But she has used both Initial Broadsides.

Turn 3, Shannon orders a Wear and Chesapeake Starboard, but both have 4 MP so they dice off and Shannon gains The Weather Gauge winning 5-4.
 She goes first and Wears downwind and Fires, inflicting a Hull Hit. As the dice are doubles it is also a Critical Hit! Chesapeake rolls a Mast Critical and her max MP is now 4, even at a more favorable wind angle.
 Chesapeake Fires and misses. Too bad...
 ...as Turn 3 ends...
 Shannon has closed in a bit on the damage, but is still behind, and has also Fired both Initial Broadsides.

Turn 4, Shannon had the luxury of knowing she would have The Weather Gauge with 4 MP to 3MP regardless of order. Choosing a Wear was therefore not risky.
 Shannon Wears downwind and Fires for another Hull Hit with a stern Rake!
 Chesapeake then Tacks but her Fire roll is too high so misses again!
 Turn 4 ends with Shannon on the opposite tack from Chesapeake and again certainly holding The Weather Gauge for next turn.

Turn 5 begins with both ships choosing to close in on each other with Starboard turns.

 Chesapeake then goes, bearing farther off the wind and rolling quite well - the 24 will be good enough for another Hull Hit despite her damage penalties. The game is nearly tied at 4 Hull Hits each - one more and either ship will strike! The only advantage Shannon has is the mast hit that reduces Chesapeak's top MP to 4.
 The turn ends with damage as below. Note that Chesapeake can no longer Tack due to reduced Crew Value.

Turn 6 begins with orders selected and Chesapeake winning the dice roll for The Weather Gauge - this could be her big chance to win the game!
 She Wear's downwind and puts herself right next to Shannon in a brilliant display of seamanship, then dices for Fire...and completely misses!
 Shannon then executes her Starboard turn and Fires...


Below, wind is from the NorthWest. Cpt Broke's Shannon at top and Cpt Lawrence's Chesapeake 4 squares [sq] below.
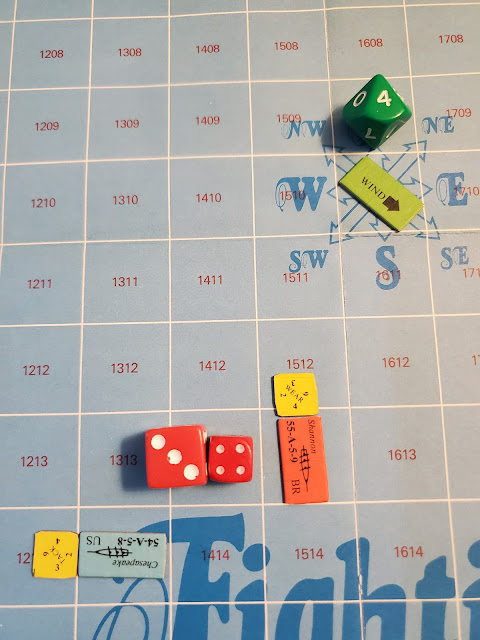
 Also needed are THE ORDER COUNTERS and two dice each of different sizes - the large dice is the "tens" and the small the "ones" so they would read 63 and 41 respectively if rolled for the above results. The orders all show the ships Sailing Value, A B or C, on one side, so the order can be hidden on the other side.
The Weather Gauge rule is a powerful mechanic and probably has to be toned down a bit. For a 2-ship action, it is pretty easy to manage as most of the time a ship can only move one sq, so it is usually only affecting who moves [and fires] first and who gets the counter-move and counter-fire. The rule plays like an old-school overwatch mechanic in that you can interrupt any ship's Move to move and fire your own ships - this risks the game bogging down a bit. Again, not a big deal with two evenly matched ships.
SOLO PLAY is quite easy thanks to the Order counters. To play solo, I decided the Chesapeak's move first then selected likely order choices for the Shannon. Below, Port seems the right move for Chesapeake, allowing her to close the distance, while I can see the Shannon benefitting from Ahead, Starboard or Wear orders...
Chesapeake then uses her superior MP to move a sq forward, turn left one point [each point is 45 degrees] and move another sq forward. This closes the distance enough for a good shot in terms of both range and a bow rake! Rolling a bit low with a '24' means that the Chesapeake inflicts two hull hits - and each ship only has 5 before they Strike their flag and surrender! Rolling low is better in this game...
As 5th Rate ships, both have 5 Hull Hits, after which they will Strike [haul down their battle flag and surrender]. At two and four Hull Hits, they have a penalty to their Fire Value. They also lose a point of Crew Value for each Hull Hit. The Shannon has a Crew Value of 9 and Chesapeake 8 - when CV is 5 or less a ship cannot Tack, and when 4 or less it cannot Wear [these were crew-intensive actions]. Rigging Hits affect MP in that at 2 a ship can only have 4 MP total regardless of wind [so more likely to lose The Weather Gauge] and at 4 Hits it can only have 3 MP total.
With 6-3 MP, Shannon automatically has The Weather Gauge and chooses to go first, rolling well and inflicting 2 Hull Hits! This reduces Chesapeak's fighting ability, to worse than Shannon's so she now has the advantage.
...rolling a 33 and a Critical Hit! This is diced off and results in a second Mask Critical, which would reduce Chesapeake to a max of 3 MPs a turn, so unlikely she would win The Weather Gauge if Capt Broke was diligent in handling Shannon. Chesapeake has 5 Hull Hits so Strikes and surrenders.
Final damage result is that Chesapeake has a lowered max speed and can no longer turn across the wind. Even if she didn't Strike, her options would be limited to attempting to get away or a Boarding action at tremendous odds.
An historical result that was filled with command [player] decisions and a few critical dice rolls settling the matter. Interestingly, Shannon's gunnery played the critical role in deciding the action, just like it did historically. Chesapeake's gunnery also missed a couple of important rolls that would almost certainly have turned the fight in her favor.
Review Summary
The bottom line here is grab a copy of this wonderful little game! If you don't want the board game, then check out the rules pdf and try it with miniatures or counters from another game. I'm looking forward to a play with multiple ships per side.
Positives
1) The game rules are well written, cover all significant aspects of war at sea during the Age of Sail, and easily play any size action from ship to ship to fleet actions; the only difference would be game length.
2) The game is quite portable, and could be played on any modest kitchen or hotel room table - a ship v. ship action would mostly be on two 8x11" papers.
3) Abstraction level is excellent - you get effects and what you need to know to make tough decisions.
4) Sailing is nicely handled. Altho the sailing mechanics are bent a bit to fit onto the grid, in a fleet action this is totally fine anyway. At the ship v. ship level, I would add a bit more variety in speeds, possibly doubling them and the ranges for a bit more handling and firing details.
5) All the mechanics flow easily and one is quickly only looking up a few things like Critical Hits and double-checking the Tack and Wear rules.
6) The grid squares and sailing / movement mechanics force players to focus on decisive aspects of maneuver rather than the minutia of maneuver. This is great because sailing is FULL of minutia and few gamers need it. The most important decisions are presented and it makes for a great game.
7) thanks to the order counters, the game provides an easy solo play system - just select the likely orders for the non-player side, choose one randomly, and have at it. The best part is you get some unexpected results and even occasionally mistakes that add drama and excitement to the player turn. Probably more interesting than the real thing!
Negatives
1) The Weather Gauge mechanic could be abused, I think. It could easily be toned down to deciding if your SIDE [as in all ships] goes first or second, with the resulting advantages or disadvantages of the decision.
2) There is no point system to create your own actions, and the selection of ships presented heavily favors smaller ships and smaller actions. If you want to refight Trafalgar, you will have to do some work or steal relative ship qualities from another more detailed game and adapting them.
3) Crew Value [quality] has more potential to be developed, but it really wasn't. Mr. Balkoski could have used a few d10 v. Crew Value for more difficult sailing functions, which seems like a bit of a lost opportunity for some great optional or advanced rules.
So... GET THIS GAME!
Thanks for the review. Quite a trip down Memory Lane. I did this game more than 40 years ago, and I think it might have been my last for SPI. There was quite a bit of discussion at the time among the SPI staff about innovative approaches to game design, in which we thought about alternatives to the classic hex system. Using squares for "Fighting Sail," was a natural, I think; and then in the game "Tito" I tried using areas. Overall, I was happy with both designs, particularly Fighting Sail. But one thing I suspected was that using the system for large battles, such as Trafalgar, would have required modifications. Thank you for the playback.
ReplyDeleteWow, so cool you dropped by, Joe - I tried to find you on Fb and didn't succeed. I dunno, I like to connect to designers and show them how their stuff stands the test of time, among other things. While I think hexes are great for land war, I was sold on this game when one reviewer noted that you could go in straight lines in multiple directions, just like real sailers, and that it worked in 8ths had me sold on trying it out.
ReplyDeleteI am presently playtesting the Action of Venice scenario, so upping to a 2 v 6 game next, and will have some more thoughts soon.
Funny thing is I had a copy of Tito that I never got to playing and sold off about ten years ago! Too bad for me.
Merry Christmas, Happy New Year, etc etc etc. Hope you are well whatever you are doing. Alex