Showing posts with label Naval Game Theory. Show all posts

Friday, July 17, 2026

Battle of Lake Erie, 1813, REDUX

Another simple, straight-forward battle...
...that is, if you think barroom brawls in the dark are simple!


Changes
- to match the historical ships better [I thought] I changed their gun ratings and ranges.  The main American ships as mostly carronade armed had only a short range of 4". This made for an interesting challenge between the British ships with a variety of long guns and carronades wanting to keep standoff distance.
- to make the wind likely to be "flukey" and change, it would change on the roll of a '1' at the start of each turn. On a change, another roll and it would be counter-clockwise a point on a 1-3, clockwise on a 5-6. I kept the windspeed constant altho I could have lowered it an inch on an even roll, which seemed most like the historical battle conditions.

- Initiative Movement. After lots of thought, I went with move / counter-move each turn. The players would roll off and winner could choose to move first [Move] or second [Counter-move]. Choosing Move allows you to occupy sea-space ahead of the opponent, Counter-move allows you to maneuver your ships to best advantage having seen what the opponent did. Counter-move is generally more advantageous given the narrow Fire Arc of the ships in these rules. Also, if forced to Move one has to maneuver pretty conservatively to prevent one's ships from a rake or other disadvantage. Overall, while it "feels" less realistic M / C-m is very realistic from a decision making and command point of view, and best of all it actually *matters*!

- Simultaneous Fire. As ships are only rolling one dice to shoot, this was easy to implement; ships that were going to return fire could do so immediately upon the opponent rolling a shot that Damaged or Cripped their ship, so it was easy to track.

- Boarding / Fowling. I used the same mechanic for Fowling as boarding; you need to roll a 5+, etc. This also gave more nuance to the Movement Phase.

- Momentum. Momentum requires ships to move their full move or 1" less at the ships starting wind angle; if you moved more than 1" less, the ship is subject to Drift. This simulates backing sail to slow down a bit. Also, Momentum requires ships to move at least 1" as otherwise the ship couldn't be controlled [so captains rarely "stopped"].

- Drift. If a ship moves more than 1" less than their max, the ship drifts 1" downwind at the end of its movement. This simulates the ship's keel/rudder having less "bite" in the water due to a slow speed.

- 8 Direction "Not-a-Grid" is easier than six and suits how ships move better than only six angles.  Plus Steve had an octagon wind marker that makes it easy to align against two edges [eyeballing it] and it can be placed next to the ship model to clean things up if needed. All ships had to face one of the eight directions at all times, e.g. no measuring with a protractor!

These were the main changes, altho they aren't many nor are they hard to implement while playing.  They worked really well, as shall be seen!

Again, at battle start, the wind was light so all movement distances were reduced by 1" to 1" Close Hauled, 3" Abeam / Running, and 5" Reaching.

The British again had a choice of the distance separating the fleet from the oncoming American one; this was to simulate the operational level advantage of having the "weather gauge". The British started with the best wind angle, a Reach [5" move] while the Americans had the wind directly behind them, i.e. Running [3" move]. This time, Steve had a different plan in mind, so started 6" farther away from the American fleet.

Turn 1
Steve won Initiative and chose to Move. On the Counter-move, the Americans only moved forwards 1" so drifted 1" downwind, for a total of 2".
Turn 2, the British and Americans repeated their Moves [above]. 

Turn 3
The British lost IN and were forced to move first; they began to cross the American "T". Americans executed their cunning plan, a plan as cunning as that of a fox who’s just been appointed Professor of Cunning at Oxford University [click]! They began their change of direction to approach the rear of the British line as it moved onwards and threatened some stern rakes, or to be out of the British ships fire arcs. They also finished their move outside of the British 8" firing range.
Furthermore, the American course change gave them a better wind angle, thus giving them more maneuvering options. Cunning indeed!  What could go wrong!?

Turn 4.
In typical British fashion, Steve had no alternative but to seize control of the wind, rolling a '1' in an underhanded fashion [altho he is a well-known expert at rolling low].
And then a '5' resulted in the wind changing a point clockwise. This put the fleets on at an even speed, with the British Abeam and the Americans running. Net result is to slow both sides down to 3" moves.
And to top it off, the British then won IN, rolling a '6' to beat the strong American roll of a '5'!
The Americans continued with their line of battle's course, seeing it as the best counter to the British plan.  But the British had a trick up with laced sleeves! They all turned to simultaneously jibe across the wind, which would ultimately change their direction 180 degrees!

Turn 5
Americans again lose IN, so begin turning a point to starboard to threaten to cross the British "T" in a couple turns!
The British continue reversing direction, but the faster turn rates of the smaller ships allows them to maneuver quickly to counter the American plan.

Turn 6
Altho the British sloops are Close-hauled, they are still outmaneuvering the American line!

Turns 7-8
Perry decides to take a calculated risk and maneuver between the sloops with his van, while letting the rear squadron of small ships move to take on the two British sloops headed their way. This certainly *seems* like the best way to present the British with multiple threats. 
A "cunning plan" as the chess match of maneuvering intensifies!
Ariel rakes Lady Prevost, Damaging her!

The American lines are now restricting the movement space of the two lead British sloops, threatening to destroy them with a concentration of fire.
But the British also slip into the American line, in which gaps appeared during their maneuvering. They rake Scorpion [Oh, where is thy sting now!] but gets fouled on a '5' passing over her base.

As Turn 8 continues, The British sloops veer away from the American line after the wind *again* changes. The fouled HMS Chippawa and USS Scorpion present a significant problem for the American's to maneuver around, further jacking up their cunning plan!
Ariel does her part, rolling well with both broadsides and inflicting 4 and 2 Hits respectively.
Chippawa Rakes Scorpion again Damaging her, willingly remaining fouled while the Americans fail to roll high enough to un-foul them.

Turn 9
The Americans lose IN and begin maneuvering around the fouled ships. Lawrence takes fire from the main British line of ships, becoming Damaged.
Scorpion becomes Crippled and with 14 Hits Strikes on the last roll!
Soon after, however, Lady Prevost Strikes also!

Turn 10
The wind changes *again*!  I double-check the British dice, as it again shifts clockwise, and puts my key vessels Close-Hauled; they don't roll any '1s' for me...

Niagara moves 1" forwards, Close-Hauled. To move within 4" of the enemy, CPT Elliott must roll a '4+' as day of battle - historically - he didn't close very rapidly, leading to much acrimony between him and Perry later.

Meanwhile, the other squadron of small ships fails three of four rolls, and all decline to get within Close Range of the British. They are within range, but [(d6-2)x1/2] isn't exactly a lot of damage!

Turn 10, from one of the Montgolfier Brother's air machines. The larger British ships are headed table "south" between the American divisions. The three smaller ships are Struck, Damaged and intact at picture bottom and top right.
The American squadron has divided into two divisions - the three larger ships to the left, all Close Hauled, and the four schooners with win Abeam. Ariel and Scorpion are Struck and Crippled respectively, pretty much out of the game.

Turn 11
British big-boys are sailing with favorable winds, while the Americans try to sort themselves out, Coming About in an effort to get more lake-space and speed. Lawrence is now Crippled, and the other two have taken some damage, without inflicting much on the British in reply. With their greater speed and maneuverability in the favorable wind, they find it easy to place themselves to advantage. Furthermore, Perry started to lose much of the IN rolls to Barclay, making it worse.
With the smaller ships, the loss of IN and failure to roll a single 4+ results in them keeping their distance from the British.

Turn 12
With Lawrence Crippled [like last battle] Perry transfers his flag to the brig Caledonia.

Again, like last battle, poor Captain Barclay is wounded! [and only on a '2' on 2d6!]
Detroit again finds itself under the command of a 15yo midshipman named "Opportunity Knocks".

The wind now favors the Americans [center-top three ships], largely due to the fact that the British heavier division has circumnavigated them [while pounding them mercilessly].
At bottom right of pic, the American small ships finally start to close with the enemy, led by the aptly named "Tigress" [Meow! Fft-fft!].

Turn 13
The wind changes again!  Clockwise a point. And instead of having the wind Abeam, my Americans are now Close Hauled - again!

As the British 'heavy' squadron rounds Niagara with their newly favorable wind, they pound her until she strikes.
It's a bit like watching the Indians circle the wagons in an old western...the four small American sloops are on the way and will certainly be of some help, but nothing will change the fact that two of the 'heavy' American ships are Crippled, and one has Struck and is Adrift.
Oh, never mind, two of them have now Struck!

With Turn 14, the British realize that they will have to break contact, as two of their 'heavy' ships are Damaged and the other is way out of position to help - may in fact be encircled by the American sloops like piranhas. Also, there is only a brief amount of time before the small British sloops are finished off, leaving the slower, less maneuverable heavies - which are mostly Damaged - to be picked off and crippled.

The Americans realize that despite a tactical defeat, they may have "won" or at least Perry can phrase it properly in his letters to the Secretary of War / Navy that they drove off the British fleet and held the "field", which also entails holding all the damaged ships.  Could be a net gain for the USA strategically.
With this discussion, which was pretty surprising when we thought about it, came the reminder that fleets are strategic weapons, and historically Barclay had to win a decisive victory to escape starving in the wilderness of greater Detroit.  On the other hand, the smaller ships are more easily replaced than the larger ones, so perhaps he will escape with his larger ships, find shelter elsewhere, and build up his squadron of sloops again.

Well, you need some criteria for victory, and we decided that based upon the damage, the British won 11-7, but are still in trouble, strategically. And with my copy of Columbia's "1812" we may in fact get more involved with strategic decisions in the near future!

Overall, among the best naval games I've played in a long, long while!

The most intense part was the sailing decisions that we had to make in the opening turns, taking into account how the ships moved and their relative position to the wind. Every turn was a nail-biter, especially with the IGO-UGO move sequence that I came up with!  Despite some misgivings, this simplest of all turn sequences was actually very effect in helping us to manage the game and make clear decisions [even if they were wrong].

The winds were light and varied historically, and we had some of that in this rematch. We both found dealing with the wind an interesting part of the problems presented to each of us.

My small sloops survived, but partly because they declined to get involved aggressively. This simple mechanic worked very nicely, and altho it made my life more difficult, it added some realism and historical flavor to the fight, and I'll definitely use it again where it suits. 

And thus, I conclude with a few thoughts in summary...

What makes for a good Age of Sail Game?
1) Sailing!  Sailing decisions that reflect the constraints of ships in weather.
2) Weather. Wind direction and strength may vary, posing realistic problems and wrecking even the best of plans.
3) Terrain. This can be land, or even struck and sinking ships.
4) Morale. Captains often fought conservatively, even timidly; this could include Admirals as well. Great victories were often more about determination than tactics.
5) Strategic level victory conditions. Naval commanders at all levels were often directly affected by the large strategic and economic picture. This results in battle tactics that only make sense if you know the strategic goals of their nation / admiralty. 

Looking forward to playing this again soon - must get to work on my 1:3000 ships...!

Wednesday, February 16, 2022

Fighting Sail [S&T 1981] - San Domingo Analysis

Old Ducky may have My Touch...
from [click]
but he doesn't have my strategic sense, that's for certain!

When determining if a game has the right "feel", we need to consider if it gives us:
  1. Historical decisions the Commanders had, at the right level,
  2. Events and outcomes like the historical narratives we read,
  3. Opportunities for a different outcome to the battle, e.g. Napoleon wins Waterloo [if the French players play well], but in mechanics presents us with the likely results, keeping us in the 90%, 9% and 1% [typical, atypical, and once in a lifetime] of results.
For this, some analysis is required outside of game time, as we are usually too distracted when playing to do much figuring!

So in a set of naval wargame rules, how likely is the historical outcome for the naval battle of San Domingo, 1806? As I'm playing Fighting Sail [1981] these days, these are the rules I'll compare to history. However, I'll present a close description of the the battle that is good enough for you to compare your favorite rules out. I'll finish by examining if FS is likely to provide similar results if:
  • players make the same decisions as the captains and admirals, and...
  • the players roll about average and/or equally well.
As this was a very eventful battle, the victory conditions should give the French the ability to do better than their historical counterparts [like even one ship escaping?] and ideally should come down to the last few die rolls if both sides play equally well [note that this could be equally poorly, or equally excellently!].

In the analysis, the most important aspects of recreating this battle were the wind angle and the point of engagement between the two forces, which were not identical - the French had a First-rate 118-gun Ship of the Line.

Battle of San Domingo, 1806 from Wikipedia [CLICK]
Note: the below account is mostly from the Wiki article, but I've re-organized and edited it for clarity and ease of following tactically.

At 06:00 on 6 February Duckworth's scouts sighted the French, observing two frigates, five ships of the line and one large merchant ship anchored in line at the entrance to Santo Domingo.[11]

The French hurriedly set sail. The French Adm. Leissègues formed a line of battle, Captain Pierre-Elie Garreau in Alexandre leading with Impérial, Diomède, Jupiter and Brave following. The frigates and corvette took a position Northwest between the battle line and the shore. 

At 08:00 Duckworth's ships divided into three divisions: 
  1. a westerly battle line to windward under Duckworth with Superb, NorthumberlandHMS Spencer and HMS Agamemnon,
  2. an eastern battle line under Louis with CanopusHMS Donegal and Atlas
  3. The four British frigates were in battle line to the west of the British battle lines, awaiting orders to assist if required.[17] 

Duckworth was concerned that there might be other French forces to the west. He therefore angled his line of attack to pass across the front of the French line and signaled to his squadron to direct their fire at the front three ships: Alexandre, Impérial and Diomède.[11]


Over the next two hours [16 Turns] the British slowly closed with the French squadron, the British divisions breaking up as the faster ships outpaced the slower. Louis' squadron fell behind Duckworth's, while Agamemnon dropped behind the other three vessels in Duckworth’s division, which otherwise remained in a tight formation. A slight shift in the wind allowed Leissègues to adjust his direction to the southwest, but the close presence of the land restricted French movements.

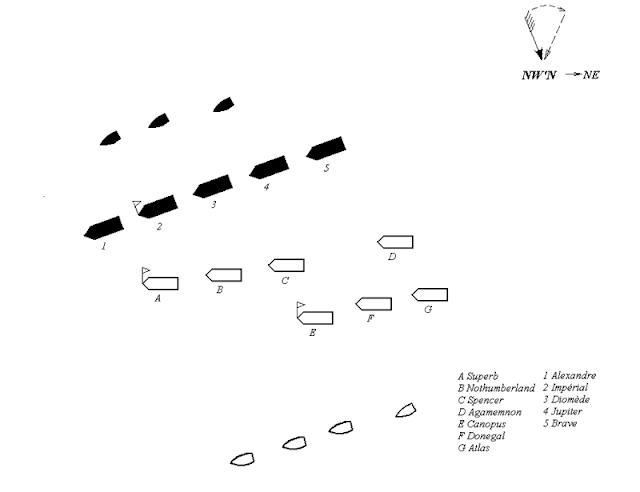
Looking at the scenario in FS1981, the British appear to be in the wrong place, on the French windward side, between them and the coast to Northwest [top left]. The French are already at the point of being engaged at the scenario start, and there is little time to maneuver without being fired upon.
The below diagram appears to be more in synch with the narrative, placing the British to leeward and between the French and the open sea. 

At 10:00, on below diagram, Hispaniola [Dominican Replublic] coastline is to the Northwest, from which the wind is coming. Adm. Leissègues was sailing from San Domingo southwest to Nizao, following the coast. Therefore the French have little sea room to Windward [upwind], and the British fleet is to Leeward [downwind].

image from Wiki [CLICK]

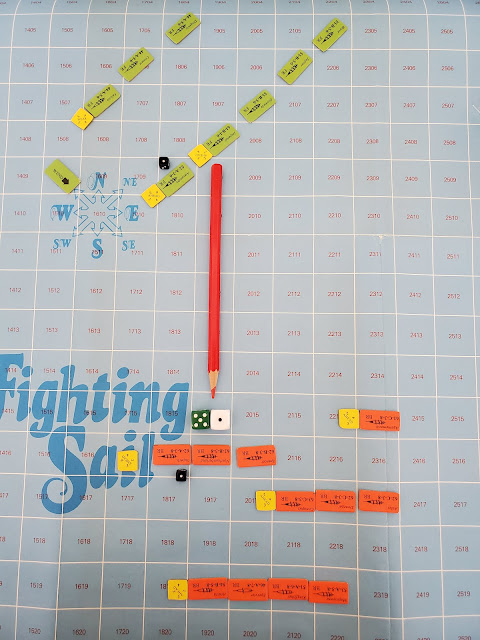
On the game board, this would look something like this:
Note that the green and red die mark where the lead ships will be on Turn 3, and show the engagement point of close range Fire.

The French are paralleling the coast to the north or northwest, so shouldn't be allowed to exit the board from 0110 to 0101 to 1501 [the top left corner area]. As the French were trying to evade the British fleet, they should get victory points for any French ships that exit the board and are faster than British pursuers, as well as for destroying British ships. The British should get the usual victory points.

Analysis from Wiki article, in game terms:
At 10:10 [Turn “1”]  Superb was able to open fire on Alexandre.[18]

With the British flagship engaged with the leading French vessel, Northumberland opened fire on the next in line, Leissègues' flagship Impérial. The French ship carried 120 guns to Northumberland's 74, but Cochrane engaged closely, rapidly supported by Spencer, which opened fire on Impérial and Diomède simultaneously. [18]   For 15 minutes [two Turns] the British continued to close, both squadrons sailing westwards along the coast with the wind [both westwards and WITH the wind?  So the wind is from the East then?].

At 10:25 [Turn 3], the damaged Alexandre suddenly swung out of the line in an attempt to drive between Northumberland and Spencer [2nd and 3rd ships in Duckworth’s first division] and rake them both. Captain Robert Stopford on Spencer responded rapidly, passing across Alexandre's bow and raking her, before turning along the opposite [far? Starboard?] side of Alexandre and opening fire from close range. In the smoke and confusion neither Superb nor Northumberland noticed Spencer's move; both fired several shots into Spencer before they realized their mistake.[19]  

With Spencer and Alexandre out of the way, Impérial was able to engage both of the leading British ships, threatening to overwhelm them. Cochrane moved to defend the flagship by pulling Northumberland between Impérial and Superb, suffering terrible damage but preserving Duckworth's ship intact. Impérial's fire was so heavy that several shot passed straight through Northumberland into Superb.[20]

Destruction of Brave and Jupiter in the French rear
As the combat raged at the head of the line, the remainder of both squadrons strained [hurried?] to join the battle.

At 10:35 [Turn 4], the British eastern division under Adm. Louis reached the battling Alexandre and Spencer the two ships locked [grappled?] together to the south of the main engagement. As they passed, Canopus, Donegal and Atlas all [bow?] raked Alexandre, bringing down all her masts and leaving her in a crippled state.

Canopus then steered straight west – to join Superb and Northumberland around Impérial while Donegal and Atlas turned northwest to intercept Brave and Jupiter respectively.[17] 

When Donegal moved alongside Jupiter, Captain Samuel Pym in Atlas abandoned his brief engagement with Jupiter and steered to join CanopusSuperb and Northumberland around Impérial Superb and Northumberland  around Impérial .[21] 

Captain Pulteney Malcolm on Donegal attacked Brave directly, firing his starboard guns and then crossing Brave's stern, inflicting severe damage with a raking broadside, before pulling alongside again and engaging from close range.[17] Badly damaged, Brave surrendered. Malcolm then ordered Captain Richard Dunn in Acasta to take possession while he moved Donegal  forward to engage Jupiter

Taking advantage of Donegal‘s superior speed, Malcolm pulled ahead of Jupiter and then rammed her bow, securing the ships together to prevent the French vessel from escaping. Recognising that further resistance was hopeless, Captain Gaspard Laignel surrendered immediately. Malcolm then sent 100 men on board as a prize crew and attached a towline to the French ship, just as the trailing Agamemnon finally reached the battle.[20]

At 11:00 [Turn 8]Spencer followed Canopus to join Donegal, Superb and Northumberland  around Impérial as Alexandre's crew was preoccupied with extinguishing a fire on board. Alexandre was so badly damaged that she was unable to either escape or continue the action; she formally surrendered ten minutes later.[21]


Admiral Leissègues drives ashore
Under the shroud of heavy smoke that confused the positions and identities of the ships at the head of the line, maneuvering became hazardous: Atlas arrived and fired two broadsides into Impérial then raked the French flagship before her tiller jammed just as Diomède loomed out the smoke. Receiving a heavy broadside from the French ship, Atlas subsequently collided with Canopus as she too appeared immediately ahead, tearing off her bowsprit in the collision.[21] 

Turning back into the battle, Atlas engaged Diomède at close range as the rest of the British squadron concentrated their fire on the beleaguered Impérial, with the exception of the damaged Northumberland, which was drifting out of the line.[22]

At 11:30 [Turn 12], With his main and mizzen masts collapsed and escape impossible, Leissègues turned his ship towards the shore outdistancing the fire from the drifting Northumberland and leaving Superb behind; Duckworth was reluctant to risk his ship in the shallow coastal shoals.[23] Canopus maintained the pressure, pursuing the French flagship until it was clear at 11:40 that Impérial was hard aground on a coral reef, less than a mile from the beach. Diomède, under attack by Atlas and the recently returned Spencer, followed Impérial ashore.
 
As they struck the reef, both French ships lost their remaining masts and suffered severe damage to their hulls. Their crews then gathered on deck and made preparations to abandon ship as the British squadron pulled back out of range of fire from the shore.[24] 

During the engagement the French frigates and corvette had all slipped between the battling squadrons and the shoreline and escaped to the westwards. The British frigates were too preoccupied with boarding and towing prizes to initiate a chase.[25]

As Duckworth gathered his squadron, Northumberland's mainmast collapsed across the deck, causing severe damage to the ship's fittings. Although Cochrane's flagship was the most severely damaged of the squadron, all had suffered to a degree: Superb's men counted 60 shot holes while Atlas was out of control and Donegal had lost one of her topmasts.[26] Casualties were also distributed throughout the fleet, with Northumberland and Spencer suffering the worst and Atlas the least except for the barely engaged Agamemnon. Total losses were 74 killed and 264 wounded and several ships were damaged, but Duckworth was rapidly able to effect repairs as his ships remained on station to observe the situation ashore.[27]

Impérial and Diomède had both run aground between Nizao and Point Catalan, their hulls broadside to the beach and their bottoms stove in by the reefs that lay offshore.[28] Using the remaining ship's boats and with assistance from the shore, the wounded and survivors were ferried to the beach. 
 
Historical result: None but the French frigates survived. While the British fleet was badly damaged, since they held the field they were able to recover their own ships and those they captured. If any French ships of the line survive and escape, the French should get at least a minor victory.

Morale. Morale was clearly an important factor in the above narrative - some French ships surrendered quickly, while others fought it out. Therefore, it may be an issue for some players that there is no morale mechanic in FS - you just destroy hull boxes until the ship Strikes [surrenders]. Note that this does not include sinking, just Striking; ergo "Striking" in game terms may actually just mean enough hull damage that a ship will no longer fight. Given that it takes on average 7 Turns to force a typical 3rd Rate Ship of the Line to strike, which is 1 hour 45 minutes, that would synch with the 2-hour battle with no ships sinking but all Striking [or running aground...same thing].
- overall, depends on if you like a Morale Check mechanic to Strike sooner [or later], but the rules use a damage mechanic instead.

Ship Speeds. This is critical in any naval engagement, as the faster ships always have the choice of fight or flight, while the slower ships are forced to fight if the faster opponent wants to, and can't flee unless they damage the enemy ships and slow them down. [the other possibility is a surprise attack caused by low visibility, or the faster fleet is caught in harbor]. 

In this scenario, as set up according to the FS rules, the British may be in the wrong place historically, but they are in the right place to be able to catch the French ships and force an engagement!  If you correct the British placement per the above historical narrative and switch the British from the French starboard to their port side, the French ships will "have the Weather Guage" and always be able to react second and shoot first by the FS rules. Being on a Beam Reach, gives all the French Sailing Value A ships 4 Movement Points [MP], while the British will all be at 3 MP, unless they immediately turn the Frigates to port.
Even using the rules for "Studding Sails" [might be better termed "Full Sail" or something - FS1981 doesn't have variable sail speeds, altho they'd be easy to tweak to do so, and I have] doesn't make a difference, as the French will still have a better wind angle and get more advantage from the Studding Sail rule:

Additionally, the presence of the 1st Rate Impérial is significant - it can easily engage ships much farther out due to how the Fire mechanic works - it uses a linear model and bigger ships easily make up for the range penalty with more guns. This translates into about 2-3 Turns of shooting first, depending on the wind angle. It's a bit like a battleship in a cruiser fight! 
Above, note that the Impérial will hit on a 51 or less, so over 70% chance; Northumberland in return needs a 21 or less, about a 35% chance. Impérial also moves at the same speed as the 74's [which is historically accurate, it seems]. In one run-thru, Impérial managed to get four Hits on Northumberland before she could effectively reply! This also goes against the above historical narrative which states that the British opened fire on Alexandre first. Thus we see that the rules allow an engagement point that is much earlier and give the advantage to the French.

So, time to check another historical narrative!

Brian Tunstall's "Naval Warfare in the Age of Sail" published in 1990 [great book, btw] has the wind astern the British and French: "Duckworth immediately chased and with the wind almost directly astern of him, gained rapidly." This would make the wind from the East. If the British are gaining rapidly, and both sides' ships perform about the same, then the wind is likely East South East, astern the French but with the British just able to make a broad reach and force the engagement on the French who were trying to avoid a fight. Overall, this seems like the most likey combination of wind angle and sailing direction. 

Interestingly, the Wiki article's most recent source is 2006, so the question is who is correct?  The later books? According to the above narrative the French are heading west, turning a bit to southwest as contact is about to occur.

Another change for the scenario would be to switch the wind to come from the Southeast, heading to Northeast [the opposite of the scenario], which completes the change of the British to the French fleet's port side and still having a wind advantage. The deployment would now look something like the below:
Now there's no way for the French to escape without a fight. The British on Turn 1 will be at black die '1', same for French. But the Superb will be moving three squares a turn and quickly block Agamemnon's forward movement. She, and the French line, will have to turn a point to starboard, and start fighting it out. The alternative option would be to do something more radical, like a hard port turn, tack, and sail in an opposing direction to the British. They'd have to fool them at a key point, and it would affect their shooting a bit, but it is possible to do against a careless British player. The French may even destroy the trailing British ships.

This seems to put the engagement point of the two opposing squadrons at the right place, with the right wind and the right options. The French player will have to think outside the box and act boldly, but there's a good chance of doing better than the historical encounter!

So back to the original question, will FS 1981 give:
  1. Historical decisions the Commanders had, at the right level,
  2. Events and outcomes like the historical narratives for San Domingo above,
  3. Opportunities for a different outcome to the battle, but in mechanics presents us with the likely results, keeping us in the 90%, 9% and 1% [typical, atypical, and once in a lifetime] of results.
As presented in the FS rules [picture below], the scenario for San Domingo should easily have the British able to close assault the French - they start across their bows and ready to bow rake the lot, plus they've the Weather Gauge. I predict a similar outcome to history as long as:
  • players make the same decisions as the captains and admirals, and...
  • the players roll about average [at at least equally well].
The French could make a 90 turn to port, which would still leave them in that strange echelon formation, however the British are suffering from it also. This would enable Alexandre and Imperial the opportunity to batter Supurb while both sides straightened out their battle lines.
There is slim chance of the French doing better unless they immediately turn tail and run away, which is possible as the scenario rules don't prevent that! As FS gives the French ships better Sailing Values generally [B to C for most Ships of the Line] they may even get away with it.

In my modified and - seemingly - more historical scenario, the wind and ship locations will result in the British again having an advantage but this time it would be hard for the French to flee, so I predict another bruising encounter that would largely depend on the British player to make a few errors to lose.

Overall, my verdict is that both as originally presented [if not historically accurate] and as modified, Fighting Sail [S&T 1981] should give both sides an opportunity to re-fight history.

How do YOUR favorite rules stack up, you think?