Playtest #2: "Action Off Venice" 1812, Frogs v. Limeys

So after an interesting playtest with the Shannon v. Chesapeake dual, the next test of the mechanics had to be with multiple ships. I chose a smallish fight, four French v. two British ships in the Adriatic, 1812. It seemed a perfect intro to larger actions.
With a west wind, and all ships heading east, the French fleet is a bit scattered. I don't know if this is historical, but they are seperated by about a nautical mile each. The British are similarly separated. My tactic has been to consolidate the French quickly as possible by having the bottom two ships move north, and the top two ships move south; generally takes a couple of turns. This puts the burden on the British to close and engage the French Squadron.

Bottom line is that the British ships have an equal opposing French ship, altho the French have lower quality; this is supposed to be made up by the extra two French ships.
Scattered around the ships on the map are the order counters, organized by Sailing Value. This makes things a bit quicker when issuing Commands.
The first outing was quite a mess, as I forgot several rules and was interrupted several times by family, and made a lot of mistakes.
The second outing went much better, as I reviewed the rules sections a bit and then played - also, it was late evening and no one bothered me! This time the British couldn't have hit the broadside of a broadside at ten paces, and were forced to use a wind advantage to sail out of range, an ignominious retreat! I also didn't play them very well, finding myself continuously surprised by sailing opportunities of the French, despite the fact I was playing both sides.
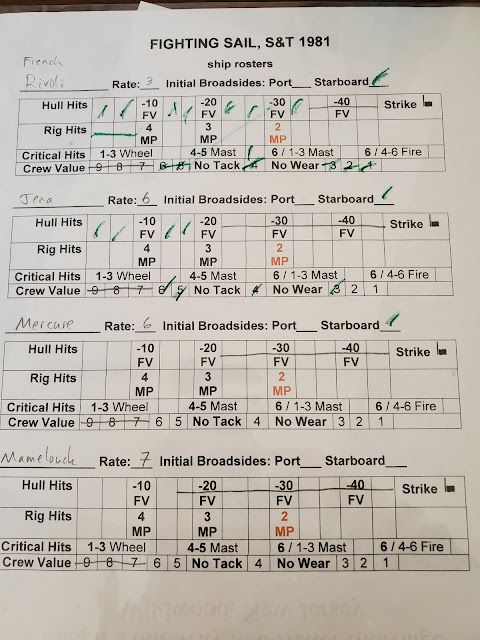
Third outing was quite interesting. The British scored an early Critical Hit against the Rivoli, slowing her down. Then some fortunate rolling got them a bit ahead of the French and they were able to cross the "T" unexpectedly, resulting in the sinking of both Rivoli and Jena.
Final positions of playtest #3. Mercure is about to get shot up pretty badly, and Mamalouke is neither fast nor lethal, so game was called.

Below is the ugly recorded reality - two ships sunk!

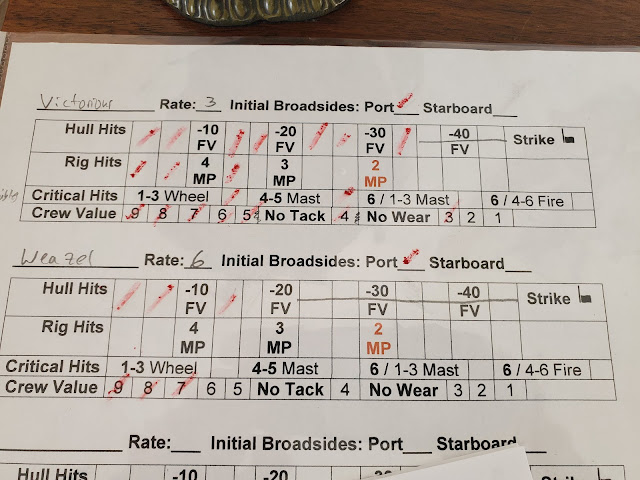
A fourth turn at bat resulted in a very different situation. This time, the Rivoli decided to start shooting as soon as possible, and on the first shot scored a critical hit, a 1/36 chance! The Victorious lost a mast. A re-read of the Damage section of the rules was helpful, as I'd forgotten that a few more Rigging Hits and a dismasted ship is Dead In The Water! This immediately became the main goal of the French.
Turn 3 below. A damaged Rivoli is at a critical moment - will she successfully win the Weather Gauge and cross the Victorious' "T" for a bow rake?? The remaining French squadron trails behind, with the Weazel putting solid damage on her opposing number, Mercure.

The critical moment - orders are revealed, and...the French have the Weather Gauge. This will be ugly...

Thanks to some skillful handling, Rivoli manages to rake Victorious, and Jena scores a Critical Hit. This is randomly decided to be a Wheel hit, so Victorious is presently unable to steer....


Victorious cannot Fire, and Rivoli and Jena have, so all are turned over.


Turn 4 ends with Weazel squring off [no pun intended] against Mercure, damaging her quite badely.


Turn 8, there is some more Fire into the Victorious, and she has to roll to be affected by ocean Swell - this would cause her to move a square downwind - but she rolls a '2' and doesn't.
I hurry on to Turn 9, resulting in the Weazel getting a nasy broadside from Rivoli and needing to sail away or also become Dead in the Water. Victorious is not victorious, and is forced to Strike, with the enemy surrounding her and no help in sight.
 Final results - a battered British squadron, and hopefully the Commodore went into captivity with a resilient attitude, as he won't be commanding again, most likely!
So four playtests, and what did I learn?
So four playtests, and what did I learn?
Some conclusions:
1) The Fire mechanics usually limit possibilities to 0-1 hit per turn between ships of the same rate. This can make the fight attrition oriented [note that this is quite historical - no complaints there!]. The main possibility of an unusual event is the Critical Hit mechanic; this occurs when there's a Hit with doubles [a 16.7% or 1/6 chance per HIT, not per shot]. This most often results in losing a mast [a real problem as two more Rigging Hits and you are Dead In The Water] or steering [also a problem]. There's a small chance [8%] of a Fire starting [bad...].
Overall, I'm satisfied with these, but I do miss Critical Hit Tables with lots of variety and preferably humorous and unusual events!
2) The Fire mechanics heavily penalize smaller ships fighting larger ships. Again, this may be quite historical, but a ship with a lower Fire Value has almost zero chance of harming a larger ship. This may make sense in these rules, which are aimed at the historically likely. I'd prefer a small chance at a Critical Hit and the ability to damage rigging, at least.
3) While the game generally succeeds and succeeds well with managing the squares as a mechanic, the additional rules to explain square mechanics are ultimately more complicated than an open-table method. There is no time saved with eliminating the need to measure distances with a tape/ruler, as you have to add up the Movement Points / Range Points, and of course there are a few fiddly things that happen - common sense can sort them out. Interestingly, I've found this the case with pretty much all gridded games, both on land and at sea.
4) Adding more ships to the mix really changes the game! There are opportunities for your bacon to get fried especially when the ships are close together. And of course gamers are always ready to run risks that real captains would not...
This last time out, I played with the below changes and was pleased with all of them.
Rule Changes:
- Dicing for additional movement, by the fraction of the MP available v. the total needed, e.g. if you need 3 Movement Points to move diagonally, and only have 2, you move another square on a 1-4 of a d6 [2/3] if you want to try it. I was torn between using Crew Value and just approaching it as a time/distance issue, and went with the latter.
- Setting a sail speed that is lower than the total MP available at that wind angle, e.g. if your max Movement Points is 5 on a Beam Reach, you can set sail for anything less so 1-4 MP.
- Presently, you subtract the Rate of the Firer from the rate of the Target, so a 6th Rate ship firing at a 3rd Rate ship starts at -30. This takes into account the mass and hull strength [damage resistance] of the larger ship, as well as the lower "weight" of the smaller ship's broadside. I don't think this should apply to rigging, however, as all rigging is vulnerable to even the smaller 9 and 12 pound guns, and Fire at rigging is already -10.
- The oddity of the square grid results in an diagonal moving ship crossing a diagonal moving ship can't rake it at one hex distance - I just allow it when it moves anyway.
- Tacking results in a -10 Fire Penalty, but not Wearing. My understanding is that while Wearing is easier, it is still crew-intensive, so should also incur the -10 penalty.
- Entering a square of an enemy ship is automatically a fouling event. A bit odd since the square is about 400-500 yards wide! So I roll a d10 - you have to roll under your present crew value to miss or to successfully foul [grapple]. The opposing ship has to miss their roll to avoid you. Grappling was historically quite rare and very difficult to do.
1) Crew Value needs to be used more. I like it to avoid Fouling and for Grappling - perhaps one could have sailing mishap on more difficult maneuvers like Tacking and Wearing if a CV test is failed?
2) Missing on Doubles - could result in a mishap of some kind?
3) Studding sails can only be set/taken in every 8th game turn. This is an odd mechanic and somewhat cumbersome to use. They give an extra movement point to ship speed. However, most actions will be over by Turn 8! So I'm going to allow starting with the studding sails set. I also want to try allowing them to be set in just a few turns, perhaps every 4th turn, or just rolling v. Crew Value to set or take them in. This will be a lot more important at the start and end of battles, mostly.
Overall, I'd say that these rules are a bit busy, around the same amount of work as Wooden Ships and Iron Men IF unusual events happen. However, if the ships choose to keep their distance and peck away at each other, then these would play quite a bit faster than WS&IM. Both sets of rules are a bit "gamey" in that there is sometimes more emphasis on mechanics over reality. Both also feel a bit gamey since they both use gridded playing areas, squares and hexes respectively.
Ultimately, I think FS it is a great introduction to the Age of Sail for someone who is good at reading and practicing with the rules a bit, and not turned off by having to re-read a few of the paragraphs, or refer to rules about unusual occurences. These are not a fast-play set of rules, IMHO. Except for 1:1 ship duals, expect to play for 1-2 hours partly due to checking the rules.
That being said, I still recommend them as a good choice for anyone interested in Age of Sail or square-gridded games.
The next task is to try out larger squadrons of ships of the line, which would be the most classic sea battle anyway. A quick look at the counter mix shows about 5-7 ships a side is possible with what is provided.
Until then, happy sailing!
No comments:
Post a Comment